For Their Teenage Daughter - A Commissioned Album


I have a friend that called me up one morning wondering if I would help her. She and her husband had arranged to take their teenage daughter to a spa retreat for a couple of days, and wanted something for her to record the experience, and more life experiences, as well as include a pocket for letters from them both. I had 2 1/2 days to complete the project. My friend had mentioned this album (click here), and so I based this one on it, modifying the size.


As you can see by the photo, I decided not to attach the journaling and embellishment, but have them ready for her to attach herself as she puts her album together. Therefore all the cards, tags and punched shapes.


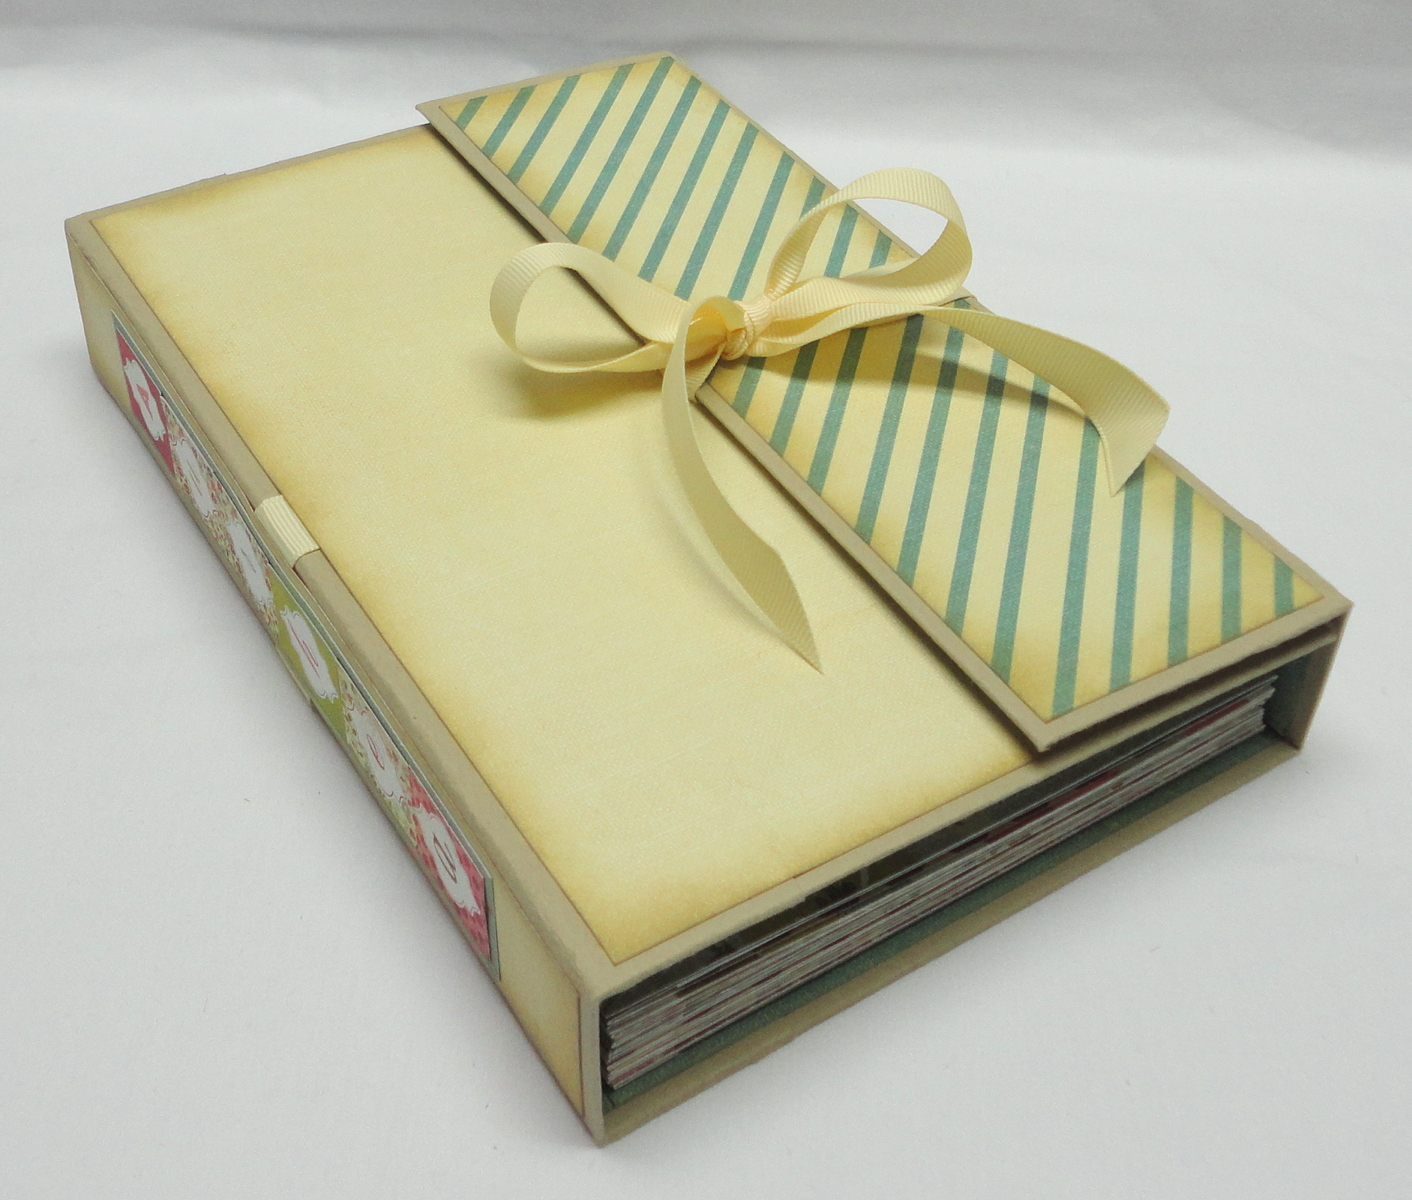
A ribbon closure done in a little different way. I wanted it to look like it was only tied around the cover flap, but I guess you can see the ribbon under the paper at the folds of the cover...


When opened, this is what you see.


The left holds and accordion of Stampin' Up dotted translucent bags, each with a tabbed tag in it created using the envelope punch board.


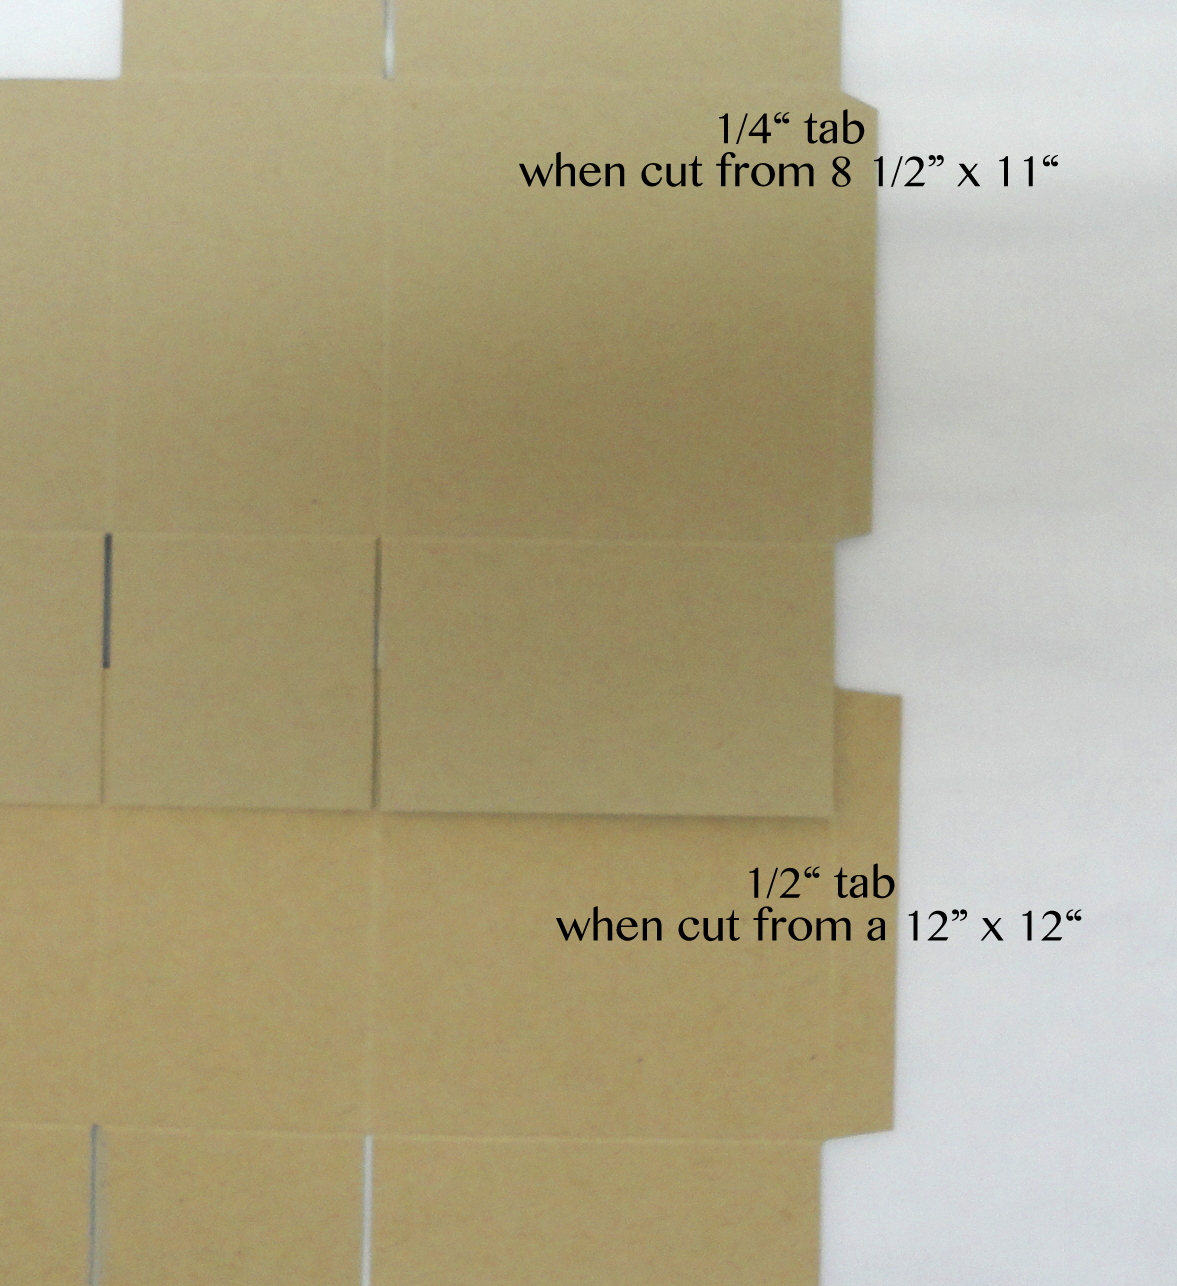
I am not going to show you each and every page of this album; just way too many of them. I did however, create outlines using either photo or journaling card templates, to give the daughter an idea of where to position them all as she assembles her album. I also added an envelope pocket here and there throughout the album as you see in the next photo. I glued the envelope shut, trimmed 1/16" off of on one side, on the front envelope side punched an oval thumb pull, and attached it to the page.


Here you can see the accordion pages created.


And lastly, and larger envelope pocket created to hold a letter from each of her parents.


Here the pocket is open.


And as usual, whenever I am creating with paper, I enjoyed doing it all. Hope there is something here to inspire your next album or scrapbooking project.

Till next time, happy creating!


Gate Fold Album - All In Neutrals


I've been working on several albums of late, and am enjoying the projects. The one I'm showing you today was a bit of an experiment using only neutral colours in Basic Gray, Sarah Sand, Crumb Cake, Very Vanilla, and a black cover using a non-Stampin' Up! product called Kraft-Tex. Its a paper/fabric which doesn't tear or crack with use, as cardstock can. That's why I used this product. I did learn a few things in using this product, and will have to adjust thow I use it for an album cover or spine.

Any way, let's get to having a look at the album, shall we. As you can see I left the cover plain with no embellishment, just the ribbon closure.

When the album is opened, this is what you see.


You will notice the 'Botanical Builder' dies were used in the album. Everything was cut from Crumb Cake. I love how it looks! Who'd have thought that it would look great in Crumb Cake of all things! But then it is a fabulous die set.


When you lift the top flap you see this. Oh, I should mention that I used another couple non-Stampin' Up! products through out the album, some older Project Life (pre-Stampin' Up!) cards because they coordinated with the colours of the album. Some of these I cut down or punched. The others are some chipboard laser cuts that I had purchased a few years ago form the store where I used to teach classes at.

The square on the upper right corner I created with several different Stampin' Up! Project Life stamp sets.


Close up - see the subtle Versamark text stamping...


Close up of the stamped square (sorry it's not real clear).


Another gate fold section to the album.


When you open that up, there is a place on the left for a larger phtoto (left), a place for a 4 x 4 photo to slide into a frame, and a booklet that opens up when you untie the twine.


Close up


Close up


When you open this booklet you can either journal inside or place additional photos.


Back to the center, when you open up the larger booklet, there are pages with sections for journaling, and places to make up a mini layout of photos, or use one very large page sized photo.


Turn the page...


Turn the page again...


Then when you flip the page that the book is attached to, you find this. There's a place for a 5 x 7 photo. Oh, I guess I should have mentioned that all these Botanical Builder parts are attached so that the photo can slide in behind them, have a part of the floral arrangement over the corners of the photos.


Then when you flip that last flap in the album, there is room for another 5 x 7 or and arrangement of smaller photos within the designated areas.


Close up for detail.


Last close up.


I wish the photos showed more what the album really looks like, because it looks much better in real life. I hope that you enjoyed seeing this any way, and are inspired for the next album or scrapbook page you create.


All these albums I'm currently making will all be for sale at future classes, crops, and markets. 

If you are interested in buying this album before I get it out in the public, don't hesitate to contact me (sabradcreations@gmail.com).


Should you are interested in knowing more about Kraft-Tex, here is a video I found. It's great stuff with many applications and uses.


Thank you for stopping by today, and happy creating!


3 x 3 Card Box Instructions

Wishing you a wonderful weekend, everyone!

I have had many requests on how to make this cute box for 10 to 15, 3 x 3 cards. Thank you everyone for the wonderful comments you've made.
So here are the instructions to making this box.


Tip: I cut to size, score, and cut to shape several of these so that when I need a box I can grab one and
put it together.

Have fun making your boxes!


You may use either 8 1/2” x 11” or 12” x 12” cardstock. The advantage to 12” x 12” is that you will have a more substancial tab for assembly, but the other works fine.

1)


Cut from 8 1/2” x 11” a piece that is 8 1/8” x 11”
Cut from a 12” x 12” a piece that is 8 1/8” x 11 1/4”

2)


With the length across the top score @ 2”, 5 3/8”,
7 3/8”, & 10 3/4”

This is the same for both sizes.


3)


Rotate, so that the shorter measurement is across the top, and the narrow tab section is at the bottom.

Score @ 2”, 5 3/8”, & 7 3/8”
4)


With your scissors, cut along scorelines so your box will look like this. Be sure that the tab is on the back side of the box with the lid right next to it.

I like to cut on each side of the score line, so that you have a narrow space between folding parts as you see in the photo.
5)


Here you can see the tab size difference depending on what size  cardstock you used.
6)


With your paper trimmer, cut off 3/8” off of the bottom two smaller sections

With your bone folder crease all the score lines
7)


With the outside of the box facing up, attach your Tear & Tape adhesive (or glue if you prefer) onto the tab as indicated in the photo
8)


With the inside of the box facing up, attach your Tear & Tape adhesive (or glue if you prefer) onto the tabs as indicated in the photo

The larger tab is on the front of the box and later will be the last one to be attached.
9)


The first part is to attach the side panel to the back panel's tab. This is 1/4” if you used 8 1/2” x 11” cardstock, or 1/2” if you used the 12” x 12” cardstock.
10)


The bottom of your box will look like this. (I have the top flap folded toward the outside with my bone folder as weight)
11)


Take the back flap down, and attach one of the smaller flaps to it.
12)


Now attach the other flap.
13)


Lastly, attach the remaining flap from the front of the box.
14)


Your box is now complete. Take your bone folder and rub the inside bottom, to be sure of the adhesive tape's maximum adhesive qualities, or the spreading of the glue.
15)


You can embellish your box however you please, but these are the measurements I used for colour cardstock, and DSP.

Cardstock Matting : 2 @ 3 1/8” x 3 1/8”, &
4 @ 1 3/4” x 3 1/8”

DSP: 2 @ 2 7/8” x 2 7/8”, & 4 @ 1 1/2” x 2 7/8”
16)


Adhere the DSP onto the Cardstock
17)


Next mark the center on the piece that will go onto the lid.
18)


Attach the Tear & Tape adhesive on the underside before punching your hole.

If you are using wide or thick ribbon you will want to use a 1/4” hole punch.

If your ribbon/cord is narrower you will use your 1/8” hole punch.
19)


Narrow ribbon/cord will be about 7”

Wider ribbon you will need more; about 8 or 9
20)


Loop the ribbon and tie a knot so that you have a loop about 1” long. For wider ribbon you may want to make it longer so that the proportions look right.
21)


Add adhesive tape to the underside of the knotted loop tails.
22)


Slip the tails into the hole from the top...
23)


...to the underside.
24)


Remove the backing of the tape by the hole, and attach the ribbon tails as in the photo.
25)


Remove remaining tape backing and attach to the top of the box, onto the lid.

Attach all other pieces and embellish your box.

These are great gift sets to give for any occasion, or just because. And of course a great way to use up your scraps!

Have fun!