skip to main |
skip to sidebar
A good way
to use up scraps is to make 3 x 3 cards (as with the boxed set on either
end in the photo below). Or, use one sheet of 12 x 12 DSP for the box
and 11 cards (as with the boxed set in the center).
Today I'm
going to show you the center Gift Card Set. For this set I used the DSP
as background and focused on the Botanical Blooms stamp set using
different colours for each card and the box.
The box is
created out of a single 8 1/2 x 11 cardstock sheet using the scoreboard
and corner rounder making a flip top box or attached lid box as you see
in the next photo.
I did not
want to take a photo of each card and grouped them all together. Now I
see that should have taken at least a photo of one of the cards for you
to see better the details. My original thought was to create a variety
of sentiments to place on them, but decided to leave them entirely blank
, inside and out.
Next is a
close up of a section of the cards. I hope you can see a little more of
the stamping detail. I stamped the darkest foreground flower first, then
with a mask created with the Botanical Builder die, I stamped the off
stamped bloom and leaves. After taking the flower mask off, I randomly
stamped the tiny floral bunch that is part of the stamp set. Love that
little bunch of flowers!
I will show you the other two 3 x 3 Boxed Gift Card Sets tomorrow, made using scraps!
Thank you for stopping by today. Happy creating!
It's me again!
OK, just to warn you, this is a real long post, showing you two Seasonal Flip Folios. I'm showing you my Thanksgiving one to you, so that I can also share one I made using
scraps of Christmas DSP. That one is without photos and is for sale, and
this one will show you the photo layout for the empty Christmas Folio.
In December (2015) I
completed a new Flip Folio Project of my US Thanksgiving celebration
with my eldest son in Phoenix.
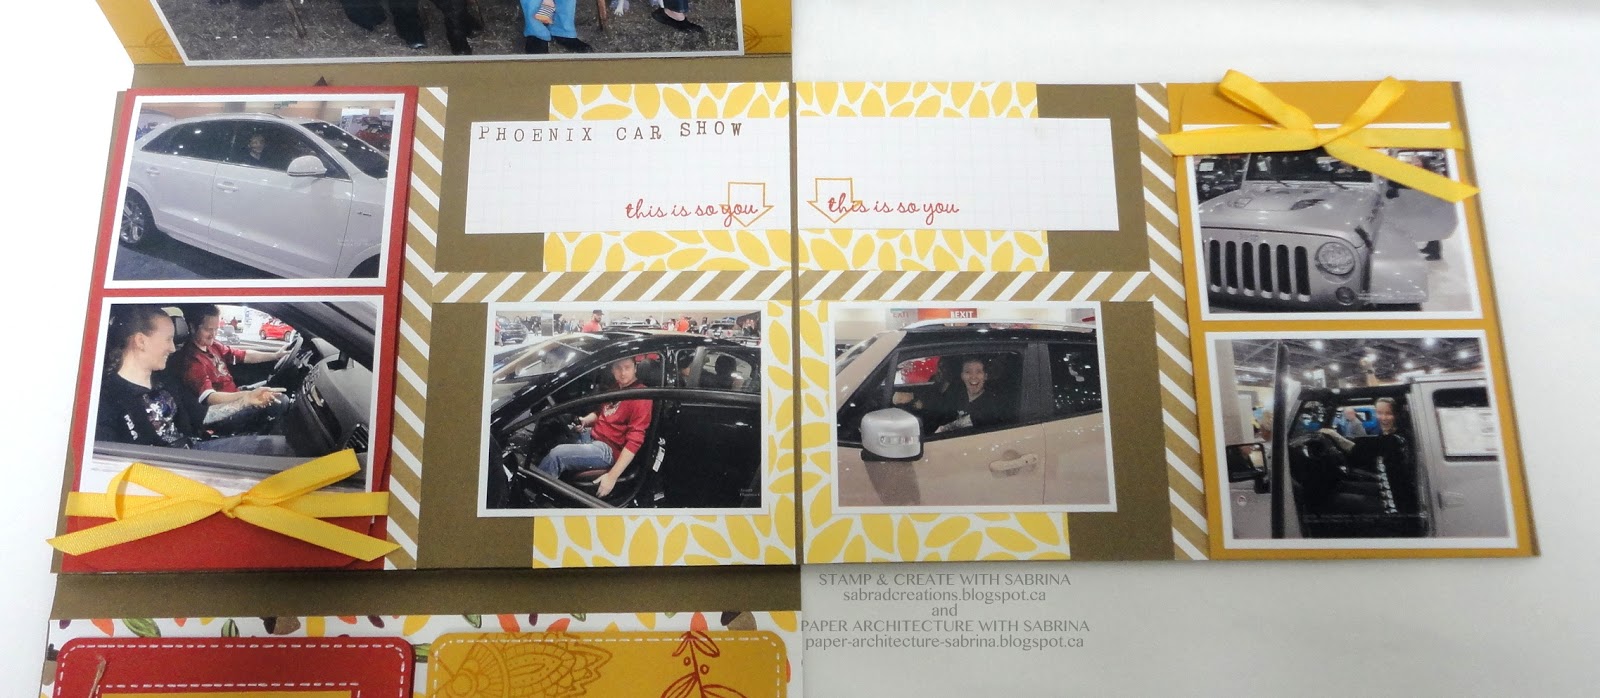
Here are
just a small portion of the photos. (I don't know what the colours will
be like for you, but on my computer they are showing awfully bright and
not at their true colours - Soft Suede, Cajun Craze, & Hello Honey)
It measures 8 1/2"w x 6"h x 5/8"thick.
For some of my more recent flip folios, I'm doing a
lot more stamping on them than I eve used to,
and using less designer
paper. You can see that I used a number of different stamp sets for this
folio. But if you make one, you can of course choose how you want to
proceed with yours; less stampin & more DSP or more stamping and
less DSP.
Hope you are inspired to create a Flip Folio for your photos.
FOR SALE
Now
I will show you the Christmas one that I have up for sale. It's almost
identical, using a little more DSP, and is ready for you add your 3 1/2"
x 5 1/2", Wallet size, 4" x 6" & 5" x 7" photos! You can use the
above photo layout for most of this Christmas Folio.
I left the year off after Merry Christmas, so that you can either stamp it in or write it in.
Rather than the elastic (ran out) and magnets, I used velcro throughout. Within the stitched area is space for a 5' x 7' photo, or a collage of smaller ones.
Tried to get a close up of the details of stamping on the flap. Didn't show up too well.
Next you see the flap open ready for either square or wallet sized photos.
When the bottom flap is opened it reveals two booklets, and the center set of accordion pages.
We'll
be going through those accordion pages, and the first one had a green
pocket large enough for a 4" x 6" photo, with a tag that can be pulled
out from behind it. The tag is great for square photos, or 4 portrait
wallet sized photos.
When
you flip that page to the left, there is space for one wallet sized and
one 5 1/2 x 3 1/2 sized photo that tuck under the stamped oval nicely.
On the right side (holly) you can make a collage of smaller photos or
place three landscape and one portrait wallet photos as you see in the
Thanksgiving folio.
Detail shot...
When
you flip the next page to the left, you see another velcro flap on the
left. Within the stitching area you can place a collage of smaller
photos or position a 4 x 6 photo.
Flip up the flap and see space for your choice of photo arrangement with a journaling spot.
On the right there is a narrow band of red. On this you can place five 1 7/8" photos.
Next
we close the pages turned to the original position and start turning
pages to the right. When we turn the first page to the right, a double
page spread is revealed. the two flaps, tucked into the ribbon, holds
landscape wallet sized photos. Not to say you can't place portrait ones
there, you just have fewer photos on the flaps then.
Here you see the flaps open...
Turning
the next page to the right, you see another flap on the left and a
large mat on the right. The left is a decorative flap; on the right you
place any sized photo/s you like.
Here is a close up of the flap details...
When you lift up the flap you can create a nice little layout, or add two large photos.
Turning
the last flap on the left, is a layout for three 5 1/2 x 3 1/2 photos
(as per the Thanksgiving Folio). One of these photos will have to be cut
in half because it is centered on the fold, so be sure you use a photo
where that will work.
Now
we go back to the bottom flap that reveal two booklets. The one on the
right is to add a couple of photos to, and the one on the left has a
space for a wallet sized photo on the cover. However, on the inside it
has paper pages to write about your Christmas happenings.
Photos...
Journaling...
So,
that's it for this flip folio. I had the Christmas Flip Folio up for
sale at the Vendor market last week, but it did not sell. So if any of
my viewers are interested in purchasing it, it is still for sale.
$30.00 if you can pick it up at my place or when I'm at the Crops at the Legion
$40.00 if I need to ship it to you.
Let me know if you are interested.
Thank you for letting me share these with you today, and Happy Creating!

It has been a very long time since I posted on this blog. It's nice to come back to where everything started, and be in touch with old blog friends again.
Today, I am going to share some
photos taken of a very special gift set that I made.
I took an empty CostCo Christmas treat box that has front magnetic closures and covered the box inside and out with Stampin' Up 'Timeless Elegance' DSP.
I used the 'Ornate Tag Topper' punch on both ends of the black cardstock to create the box label. From the side you can see the secondary exterior paper.
In
this next photo you see the interior, and the fact that I had to add
magnets to the flap because with the store paper layer and then my own
on top of it, the magnets needed some help to close the flap.
In
the center I created a long box dividing the space into two sections.
This box is meant to hold pens and such. At the back end of the pen
compartment you'll see a tiny box. I created this to hold stamps, a roll
of stamps.
Here
is the little stamp box. It measures 1 3/4" square, by 1 3/4" high. I
used the Word Window punch to make the little 'stamps' tag.
Next
you see a dozen 3 x 3 cards made for the Card Box Gift Set. (I'm not
showing them individually, but if you click on the photo, you can see
the image a little larger to get a better look at them.)
Here are 14 tags that I made real quick to try and coordinate with the cards made for last year's card classes.
There
are 14 cards in this gift set, so I had to split the pile into two. You
will recognise these cards from last year's classes and postings.
The first seven cards...
The next seven cards...
With
all of the cards out of the box, you can see that rather than make a
box for each section, I wanted to see the DSP without having to cover
all the boxes with more DSP. So I decided to hold the cards in their
sections by just attaching ribbon on the bottom and tying them around
each stack of cards.
A closer look at the ribbon ties.
A closer look at the tiny 'stamp box'.
FOR SALE
This
Card Gift Set holds 14 cards, 14 gift tags, and twelve 3 x 3 gift
cards! If you were to total up all the items created for this set, it
would come to $92.50! With this box, once the cards and tags are gone,
you can keep adding purchased or your own hand made items to put inside.
Great gift, right!
Unfortunately
this Gift Set did not sell at the Vendors Market last Wednesday (for the asking price of $75). But I am
willing to go down in price if anyone is interested in purchasing this
Gift Set...somewhere around $65.00.... It could be a Valentines gift,
Easter gift, Mother's Day gift, Birthday gift.... If you are interested,
email me (glimmercraft.sabrina@gmail.com) and we can make arrangements. I'll even ship it with the
shipping cost added to the price we agree on.
Happy Papercrafting!