Home Sweet Home Frame - Scrapbook Parade Class


This was such a fun project to make. With the noticeable change in foliage colours these days, I was drawn to use like colours in paper for this project. Soon it's back to school, and not long after it will be Thanksgiving! (In Canada Thanksgiving is in October). This four photo frame is easily embellished with the paper.

Here are close ups from either side.


This class is scheduled for October for those of you that are followers at Scrapbook Parade here in Victoria. We'll be using three papers of the Upsy Daisy's Home Sweet Home collection.

Thank you for stopping by today, and happy crafting!


Vintage Keepsake Box - Scrapbook Parade Class

I love some of the classic colour combinations, and this one is one of my favorites - peach, ivory and black! Using the Prima Almanac collection and some of the matching embellishments, we'll be creating this keepsake box September, 22nd.


See the little key hanging on the right? Well in the shot below you can see the fancy little keyhole on the lid. Of course it's just embellishment.


Isn't that a beautiful keyhole? And the ribbon bloom was made with 48" of 2" wide ribbon on a 2" Gluber.
Want to see some of the inside? Check out the next photo.


Below is a collage of all 8 photos that I took for this project. If you click on it it will larger to see more of the details. I love the little wood legs I coloured and put on the box.


Well hope you enjoyed a little vintage candy and the beautiful colours. Thanks so much for checking in, and hope that your day has time for a little crafting!


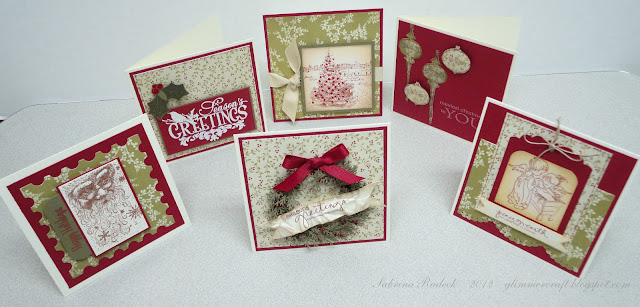
Country Charm Christmas Squares - Scrapbook Parade Class

Hello everyone! Today I'm sharing with you a class we're scheduling for October. This lovely rustic, and charming country set of square Christmas cards have a unique twist on the traditional red and green for Christmas. The chili red and olive green lend themselves very well for the country charm appeal of these cards.

I used the same papers repeatedly on this set.


Since I'm leaving soon to go to work for our Toonie Tuesday, I'm just going to post the individual card photos with only a few words.


Paper pieced ornaments with Glossy Accents. Sorry it turned out blurry.


Which the white embossing powder was more cream in colour.


Adorable angel stamp. Thanks  Stef! Again, blurry?


Copper heat embossed image and sentiment.


Well, I guess it wasn't my day for taking photos! Love this BoBunny stamp.


I just love using Martha Stewart's Branch punch, especially at Christmas.

There you have them. Apologies for the blurry photos. I did them in a hurry, and one should never rush such things.

Thank you for stopping by. Happy crafting everyone!


CR84FN and Retro Sketches

I absolutely adore this week's Retro Sketch. Don't be surprised to see it crop up here again in the future. ;)

I used CR84FN's gorgeous colors for my creation.


I'm loving textures since the Papertrey Ink blog hop this month! I've used felt, canvas and twine here.

Thanks for stopping by!


{Supplies--all Papertrey Ink unless noted}
  • Cardstock: Rustic Cream
  • Patterned Paper: Library Leger
  • Stamps: Round & Round
  • Ink: Classic Kraft
  • Dies: Notched Flowers, Labels 17 (Spellbinders)
  • Felt: Fine Linen, Ocean Tides
  • Other Tools: Rustic Cream button twine, Kraft button, canvas (unknown)

Hot Off The Press Christmas Stamp Card Class - Scrapbook Parade


Hello blog friends! So nice of you to stop by today. You can have so much fun playing with stamps and seeing what kind of creative things you can come up with. I had so many ideas coming to me on what could all be done with this stamp set from Hot Off The Press. I had to keep telling myself to keep it simple and keep the thickness from pop dots and layering down to a minimum. Boy, was that ever hard. I don't know what it is that makes me want lots of layers and pop dots! I mean, sometimes I have to mail these things, so you'd think I'd be more careful!

Any way, these are the cards we'll be creating in class at Scrapbook Parade, for September 19th. I've included a photo of the stamp set we're using in class so that you can refer to them when you look at the cards.

So here goes.


Since in previous Christmas card classes we've used traditional red, green and gold, and then blues and silver, I thought I'd go with mostly white with this set of cards.

Let's start with the simplest card first.


The Poinsettia ribbon and sentiment medallion are the focuses on this card. Yes, I used pop dots...but only for two layers. I used a thinner pop dot and the card is very mailable. The gold medalion border is heat embossed, so nothing extraordinary for stamp useage here; I just turned the square to a diamond.

This card also didn't use the stamps in any special way. But I do love white embossing on white, so this is what I did.


I used Cuttlebug's Holly Ribbons embossing folder in the background layer and heat embossed the white oval over which I placed a laser cut Santa sled. I love the tiny jingle bells at the ends of the ribbon. This card has only one layer popped up!

Now we get a little more into the creative stamping.


Here I used two stamps to create the background pattern in green and red inks. I punched a scalloped circle in red and heat embossed the the three stamps in the circular lace sentiment. It looks better in real life.

With the next card I used some of the same stamps creating an overlapping border and stamped Merry & Bright within it. Again I used only one layer of thin pop dots. Aren't you proud of me?


For the background dry emboss I used the Cuttlebug Dots embossing folder.

And for our last card I used five of the stamps, again in red and green inks, and some Star Dust Stickles around the edges of the card as well as around the circle, which I hope you can see.


So this is it for my simple white cards and practising creative stamping. Thanks for checking it out, and happy crafting.


Family Christmas Folio - Scrapbook Parade Class

I'm so excited about this project! This 12 x 12 folio will hold your Christmas cards, gift tags, photos, journaling, year in review, and a 10" x 8" family portrait,invitations, concert programs, plus anything else you can think of to keep from your Christmas celebrations. You can have it standing as part of your Christmas decor and add to it daily throughout out the season.

For the project we are using Teresa Collins Christmas Cottage collection with matching Washi Tape.


The idea for this project originated with Katy Orta (https://www.youtube.com/watch?v=JxJ94cPdj-M) I'm not sure how she made it but I made calculations on how to construct it while making a few changes in the design. I made it much thicker to hold more pockets and tags; I made all three of the lower pockets 1/8" deep to hold bulkier or bunches of things, like smaller cards or gift tags; I added 12 additional pockets with tabs, 6 on each side in the side bindings.

What I love about this project is that you can stand it up and have it on display throughout the Christmas season as you add the programs to special Christmas concerts you attend, or invitations to festive parties, or add your Christmas portraits and photos to, add your Christmas cards to, the gift tags, notes and journaling through of year. There are probably even more ideas for this Family Christmas Folio.

Here is what it looks like standing up.


I forgot to add the three hanging ornaments at the bottom of the large framed mat in the center! I'll have to add another photo when I get it back.


The lower right corner displays the year, which I cut from cardstock using my Cricut. The shepherds and lamb are a laser cut chipboard that we carry at Scrapbook Parade. We have the choice of snowflakes, trees, Santa's sleigh, and angels should anyone not wish to have the shepherds.

Here is a closeup of the bow and embellishments.


I love the concept of this project and think it would be great to make this again as a wedding folio. My oldest son is getting married in October, so this may make a great gift. I'll have to make time to make one for the two of them. This project would also make a great folio for a birth, graduation, special vacation, 50th wedding anniversary, or for your child's school years K through 12!

I have a YouTube video for you to view where I describe more details for you. It's my first video. In the past I've taken tons of photos and created slide shows. So I hope the video is a good one for this project. If you have some helpful tips, please let me know in the comments.


Thank you so much for stopping by for a look at this fun project. Happy crafting everyone!


Paper: Teresa Collins Christmas Cottage
Ribbon: May Arts 2" Burgandy Satin Stripe

PTI Blog Hop 2

A card dedicated to pattern and texture for Papertrey Ink's blog hop.


My color's were inspired by the strip of Studio Calico fabric: gray, cream and brown. I normally wouldn't pair brown and gray. I impressed some Rustic Cream cardstock with Woodgrain and then inked the edges with Frayed Burlap (love this color!) and Vintage Photo. I adhered the fabric after die-cutting it with the Simple Circles border.

Using the Tree Tops die, I cut 3 trees out of burlap, canvas and some fabric scraps from my curtains. I stamped the little bird from Through the Trees onto the canvas using Classic Kraft ink. The sentiment, from Falling Leaves, is stamped in Vintage Cream ink.

I'm also entering this into this week's Make It Monday: fabric die cuts.


{Supplies--all Papertrey Ink unless noted}
  • Cardstock: Smokey Shadow, Rustic Cream
  • Stamps: Through The Trees, Falling Leaves
  • Ink: Vintage Cream, Classic Kraft, Frayed Burlap and Vintage Photo Tim Holtz Distress Ink (Ranger)
  • Dies: Tree Tops, Simple Circles border
  • Other Tools: Woodgrain impression plate, Fabrips (Studio Calico), Canvas (unknown)

PTI Blog Hop: Autumn Patterns, Textures & Textiles

I planned a card involving felt and argyle and perhaps I will still get to it. In the meantime, I played around with watercolor! I love the texture from the watercolor paper and the softness of the painting. The colors were inspired by the Autumn inspiration photos from Papertrey Ink's blog hop as well [below].


I watercolored by stamping my inkpad on a sheet of acetate and then spritzing it with water. Very effective technique! It drove me nuts to purposely color outside but I LOVE how it looks and will definitely use this technique again!

The sentiment panel hides a very unattractive boo-boo but I couldn't bear to part with my leaves!

Thanks for peeking!


{Supplies--all Papertrey Ink unless noted}
  • Cardstock: watercolor paper (Simon Says Stamp)
  • Stamps: Delightful Dahlia, Vintage Picnic Sentiments, Pretty Peonies
  • Ink: Spring Moss, Ocean Tides, Memento Rich Cocoa (Tsukineko), Antique Linen Tim Holtz Distress Ink (Ranger)
  • Dies: Delightful Dahlia, Pretty Peonies
  • Other Tools: paint brush (dollar store), Inkssentials Mini Mister (Ranger), Lemon Yellow Liquid Pearls (Ranger)

PTI Stamps for Sale

Guess everyone's gotten the cleaning bug!

I have a bunch of Papertrey Ink stamps/dies for sale here if you're interested! (You'll have to log in or register for a free PTI forum account.)

Updated:
Here's the info from the PTI forum (italics indicates set spoken for):

Buy 3 or more, get free shipping (Canada/US). Otherwise $5 shipping. (Shipping from Alberta, Canada.)
Christmas sets listed at the bottom.
PayPal payment preferred, otherwise PTI gift certificates acceptable.
Most sets have 1 or two stamps stained (doesn't affect performance), otherwise perfect condition.

Combos for sale (count as 1 item)
- Egg Hunt, Scrambled Eggs, egg die and basket/bunny ears dies -- $30!
- Up, Up & Away, Up, Up & Away Sentiments, hot air balloon dies only -- $25
- Women of Life, Women of Life Additions -- $15
- Quilter's Sampler, Quilter's Sampler Additions, Quilter's Sampler Sentiments -- $35

$15 sets
- 2009 Autumn Tags
- Beyond Basic Borders
- Daily Designs (Daily Designs Sentiments below)
- Everyday Button Bits
- Faux Ribbon
- Giga Guide Lines
- Lighten Up + die
- Mega Mixed Messages
- Mini Scrapbook Series: Tabs + die
- Modern Basics
- Piece of Cake
- Tags for Spring

$8 sets
- Birthday Basics
- Birthday Bash Sentiments
- Daily Designs Sentiments (Daily Designs above)

CHRISTMAS
$15 set

- Holiday Button Bits

$8 sets
- Holiday Spirit Sentiments
- Holiday Wishes


My Girls Visiting Summer 2011


Hello everyone! Hope you had a great weekend.
About three weeks ago I was able to attend a crop at Scrapbook Parade. My first actually. In attending I was able to create something for myself and not for a class! I so enjoyed it. I created a dbl page LO using some of the photos taken last Summer when my three daughters and their children came for a visit to Victoria.


I chose to work with a couple of  Basic Gray papers and matched up some cardstock with the colours. Using two of the floral patterned papers, I cut a frame of flowers, and with one of the pieces cut away I fussy cut as many flowers and leaves as I could to add to the frame and scatter throughout the layout.

I added a lot of Glossy Accents on the flowers and leaves here and there. Hope you can see that in the next close-ups.


For the lettering of the title, I used my Cricut to cut letters out of one of the cardstock colours.


I wanted the letters to stand out a bit more, so I used a marker around the edges of the letters and added the stitching as well.

I had a lot of fun working on this LO and remembering the fun we had when my girls, and their Dad, came for a visit. So thank you for stopping by to have a look. With Summer nearly over, there will this year's photos to do. Where does the time go?


Colour Series - Sophisticated Black - Scrapbook Parade Class

Hello my blog friends! It's been a while. I'm busy getting ready for our September 1st  class reveal and trying to reorganize my workspace at the same time! I could have timed that better, right.

 I love experimenting with colour combinations! And black is a great colour to do that with as it compliments colours so nicely. There are six A2 cards for this class using red, peach, light blue, an olive like green, bright yellow, and silver with black.


Now you'll have to forgive some of the photos as I may have gotten a little too close for a clear photo, or with all the people around me at the store I was a little rushed taking them. As soon as I can I'll replace them. Probably early next week.


I think I should have left the blue sheer bow off of this card.


I just love how perfectly shaped the Black Diamond Stickles in the upper left corner came out!


Finally got to use those beautiful Websters cameos on a card!


Don't you just love that bright yellow from BoBunny Double Dots collection!  When I work with a lot of black I like to used my Tuxedo Black ink pad on the paper edges which you can see on the white and yellow pieces.


Once again I used Black Diamond Stickles on the Labels 20, as dots under the stamped sentiment and in the Spellbinders Bitty Blossoms flower centers.


This is three silver embossed on black flourishes and fussy cut out. One I cut in two and arranged on the front. Some are glued on, while others are popped up. I made a silver gray rolled ribbon bloom and centered a Upsy Daisy brad in it.

So there you have the six Sophisticated Black card set. Thank you for coming by for a peek. And while you're here let me know what your favorite colour is when you use black. I'd love to read about them.

Happy crafting everyone!