CPS Card Sketch 237 & Jay Gee's Nook Challenge 12 - by Sabrina

CPS 237
Jay Gee's Nook
I've been searching challenge blogs, other than the usual ones I usually check out, and found one I'd never come across before - Jay Gee's Nook Challenges. I hadn't checked out 
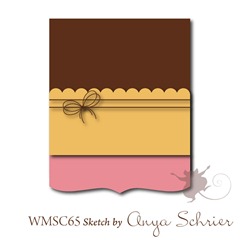
Card Positioning Systems Card Sketches in quite a while and liked the sketch they have. As you can see these are the two challenges I decided to combine this week.

This time I decided to use the challenge colours as just splashes against a mainly white card. I'm thinking that the colours for this challenge brings to mind baby cards, perhaps wedding cards, or very feminine cards. I chose to make a feminine birthday card.

Using Hero Arts Fancy Flourishes stamp, clear Versa Mark and clear embossing powder I created the suttle background.
I used Martha Stewart's Deco Fan Corner punch to create the bar as indicated in the sketch.The SEI butterflies, again are stamped with Versa Mark and embossed with clear powder. I felt that the card needed a little more yellow and added the Liquid Pearl Pale Yellow.
I chose the darkest of the Jay Gee's Nook challenge colours to position on the inside of the card behind the punched bar. When you open the card, it looks like this.

If some of our regular viewers are wondering why I've not started making Christmas cards like Dana has, it's because I made so many last year for the Christmas Craft Sale and still have enough left to give out this year, so  there is no need to make any again for this year. I do, however, plan on making some Christmas projects, so watch for them.

I thank you for stopping by today to view my challenge entry, and for leaving your comment. I wish you all happy crafting. It's that busy time of year again with Halloween, Thanksgiving, and Christmas just around the corner.


Tools & Supplies

Liquid Pearls - Pale Yellow
Ink - Memento Rich Cocoa, Versa Mark
Stamps - Hero Arts Fancy Flourish, SEI Bridgeport, Flourishes Tag Lines
Clear Embossing Powder
Punch - Martha Stewart Deco Fan Corner

Papertrey Playhouse "Use It" Weeks 3 & 4: Dies, CAS-ual Fridays and Simon Says Stamp

I'm back with Part 2: Weeks 3 & 4 of my Papertrey Playhouse "Use It" challenge. This time I'd like to encourage you to use a PTI DIE that you have yet to use!

It's quite possible that you HAVE used them all, so you can, alternatively, use one that hasn't seen love in awhile.

I hadn't used my Vines border die (among several others!)...


I used the CAS-ual Fridays challenge as a guide for this one: 3 monochromatic colors plus brown.

Simon Says Stamp has an "anything goes" challenge going on right now. Love!

Hope you'll play along!

[Edited to add:] I'm linking this to the Lily Pad Cards bling challenge here.


{Supplies--all Papertrey Ink unless noted}
  • Cardstock: Stamper's Select White, Raspberry Fizz, Hibiscus Burst
  • Stamps: Baby Button Bits
  • Ink: Dark Chocolate
  • Dies: Vines
  • Other Tools: E57 Copic, glue pen & Prisma glitter, Dark Chocolate and Sweet Blush buttons, white embroidery floss, Stardust Stickles (Ranger)

Lawnscaping, Lily Pad Cards and Simon Says Stamp


Sneaking this in for Lawnscaping's Getting Texty challenge! The holly bling (Stickles) qualifies this for Lily Pad Cards and Simon Says Stamp is having an anything goes challenge!

I used my ink blending foam and Fresh Snow ink to splotch up my Book Print impression plate a bit. I used Post It notes to keep my card in place while running the sandwich through my Cuttlebug.

I stamped the sentiment using Smitty's ABCs onto a banner from Bannerific. The holly is from Bows and Holly.

Thanks for stopping by!


{Supplies}
  • Cardstock: Pinefeather (Papertrey Ink), parchment
  • Stamps: Bannerific, Bows and Holly, Smitty's ABCs (all Lawn Fawn)
  • Ink: Pure Poppy, Fresh Snow (both Papertrey Ink), Memento Tuxedo Black, Versamark (both Tsukineko)
  • Other Tools: white embossing powder (Filigree), Christmas Red Stickles (Ranger), Corner Chomper (We R Memory Keepers), Book Print Impression Plate (Papertrey Ink)

Young Crafter's Unite Matching Envelope

Since Embellish only allows a sketch challenge to be combined with their color challenges, I kept my Young Crafter's Unite matching envelope challenge separate from my previous post.


After doing this, I really want to start coordinating all my envelopes! I usually line them using my Papertrey Ink A2 Envelope Liner die, but even adding one stamp (or, in this case, spray) can really complete a project!

Thanks for stopping by!

{Edited to add:} This combo won Top 5 at YCU! Boo-yah!


Embellish Color Trends and Misting

A birthday card for a dear friend:


Embellish's fab colors include a green turquoise, gray, brown and cream (or maybe white). I created my own turquoise green Glimmer Mist by combining Turquoise Blue and some English Ivy and then used it to "dye" my bloomer ribbon as well as mist the card panel. The sentiment, stamped in brown ink, is from Paper Smooches "Word Up." The pins are Maya Road (Vintage Black Pearl) and Making Memories (clear head).

You can tell I misted the interior, as well, which made it too pretty to write in! ;) I misted the envelope and still have lots of leftover mist!


Thanks so much for stopping by! We appreciate every one of your comments!

[Edited to add:] This card was included in Embellish's What's Hot (kind of like an honorable mention)!! I'm so ecstatic!!


I'm that last thumbnail!! Yippee!!

[Edited to add:] I'm linking this to Lily Pad Cards bling challenge here.


{Supplies}
  • Cardstock: Vintage Cream (Papertrey Ink)
  • Stamps: Word Up (Paper Smooches)
  • Ink: Dark Chocolate (Papertrey Ink)
  • Glimmer Mist: Turquoise Blue and English Ivy (Tattered Angels)
  • Ribbon: white bloomer (American Crafts)
  • Other Tools: Corner Chomper (We R Memory Keepers), vintage pins (Maya Road and Making Memories)

Waltzingmouse Sketch and Christmas Card Challenges + Lily Pad Cards and Simon Says Stamp

I wanted to be sure I got my Waltzingmouse Sketch challenge linked in time this time!


Such a fabulous sketch this week! I considered doing a scalloped card base so it wouldn't roll around but I really liked the sketch as was.

I am, of course, working on Christmas cards so that's pretty much what is going to be seen from me for awhile. This card work's for the Waltzingmouse Stamps forum February Christmas Card challenge--to use something lying around your workspace. The sentiment banner I used had already been diecut and inked up... I just stamped the sentiment! Definitely like the idea of having these all prepped and ready for cards...

I started by diecutting 3 green circles and a partial burgundy with my Grand Nestabilities. Can not recommend these enough!! Even though I have a Cricut... I just have a hard time pulling it out and going through all the necessary steps... I inked and stamped the snowflakes and then stamped and gold heat embossed the (what I call) Victorian strips. I used a bit of adhesive and then zig-zag stitched the pieces together. I probably should have left it at that but I attempted circle sewing since I had fairly good success with it before. Um, not so much this time. I tried to even things out with a 2nd attempt and then decided to make it look purposefully "messy" with a 3rd. Didn't quite work, but I'm still okay with the outcome.  ;)

I stamped, cut out and blinged the holly with Stickles and Sakura Stardust gel pen. I'll be entering this into Lily Pad Cards bling challenge. Too easy!

Simon Says Stamp's weekly challenge is to use punches or dies... I love my dies!!

Thanks for stopping by!


{Supplies}
  • Cardstock: Simply Chartreuse, Scarlet Jewel (Papertrey Ink), random white
  • Stamps: Seasons of Love - Tags, Very Vintage Christmas (Waltzingmouse Stamps)
  • Ink: Versamark (Tsukineko), Forest Moss (plus banner inks--probably Antique Linen, Vintage Photo and Walnut Stain) Tim Holtz Distress Ink (Ranger), Scarlet Jewel (Papertrey Ink)
  • Dies: Grand Circle Nestabilities (Spellbinders) plus Tattered Borders (Tim Holtz Sizzix)
  • Other Tools: sewing machine/thread, Burgundy Stickles (Ranger), Stardust gel pen (Sakura), gold embossing powder (Filigree)

Mojo Monday 207 & Play Date Cafe 100 Challenges by Sabrina

I'm not so sure about this card, but decided to enter it anyway. This entry is for the Mojo Monday 207 and the Play Date Cafe 100
challenges. I was drawn to both the sketch and the colors but decided to try to create something differently because usually these colors, the green, orange and yellow, make me want to distress ink with brown around the edges. I decided not to do that this time, to try and keep it more simple. I don't think I was successfull in the attempt. But, I'm sharing with you just the same.
After assembling the card, before adding the finishing touches of the leaves and button, I couldn't just leave it as it was. Something was missing. At this point I was wishing I had done my usual with these colors and inked the edges with brown. That's when the thought came to add the stitching detail. It looked better to me and I added the leaves and string tied button. I have jars and jars of leaves and handmade flowers made from my scraps, ready for me to use when I want. It helps in using up the smaller scraps of paper, and having them already made saves time quite often when putting together a card. From the photo I took and included below, you can see that I need to fill up some of the jars again as the content of some of them are getting quite low.
I hope someday to get rid of these applesauce and jam jars for jars that are all the same size and design.
Thanks for stopping by to check out my entry for these two challenges.

Colour Create DT Challenge 80 & Papercraft Star Callenge Sketch 63

This is a very exciting challenge! Colour Create Challenge 80 is including the option of applying for a new DT opening. Adding TEXTURE to the colour challenge is the indicator you want to apply for that opening. I chose to combine this challenge with the sketch challenge 63 at Papercraft Star.

So, without further ado, here is my creation of the combined challenges.


You will note the green I used is not quite like the green in the challenge photo, but is the closest I had to it. (The lighting also changed the colour a bit.)

This is my first attempt at the fan folding technique and I love the effect and texture it adds to the card. The green is embossed using the Cuttlebug and Spellbinders Impressionabilities, and the sentiment medallion was created using the Spellbinders Fancy Tags II. I cut two tags, cutting the oval center out of one of them for the sentiment, and took the outter fancy part, cut it into two, and added it to the full 2nd piece at the top and bottom of the Fancy Tag backing. I then attached the fan folded strips behind the sentiment piece and glued it on top of the Fancy Tag backing. Taking a couple of lime green pearls I attached them at the two peaks of the oval.

With the embossed green, the fancy tag and the fan folded strips, a lot of tactile and visual texture has been added to the card. Is it too much? I guess I'll have to wait and see what the Colour Create Design Team has to say. I would sooooo love the opportunity to work with the team on the fun and inspirational challenges to come. I'm sure many of the entrants would love to have the opportunity as well. There are some great designs being entered. Good luck to us all, and happy crafting! Thanks for coming by today and leaving your comment.


TOOLS & SUPPLIES
Ink: Memento Tuxedo Black
Stamps:  Little Paper Shop - Topiary
Punch: Martha Stewart Layered Arches
Spellbinders: Shapeabilities Fancy Tags II & Impressabilities Tulips

ADDED

I won Honorble Mention at PaperCraft Star with the PaperCraft Star Comet award! So fun!!  It's not even all that great of a card.


Waltzingmouse Sketch and Christmas Card Challenges + Lily Pad Cards and Simon Says Stamp


This week's Waltzingmouse Sketch... I forgot the challenge ended at 11am my time and missed linking! :(

I made this with May's WMS Christmas Card challenge in mind which calls for trees (must be a forum member to view).

I broke out my Glue Pad to glitter up those starry trees. I used a chisel glue pen to glitter the edge of the torn vellum (I Xyron-ed the vellum first). I used a strip of green sequins to draw the eye to the sentiment.

Simon Says Stamp's weekly challenge is to use punches or dies... Love my Edgers dies!

Lily Pad Cards has a bling challenged sponsored by Simon Says Stamp! Too easy! Glitter may be a pain to work with but it certainly adds bling! [Edited to add:] I also added 3 rhinestones in front of "greetings." The sentiment seemed a little naked!

Thanks so much for looking!


{Supplies}
  • Cardstock: Stamper's Select White and Vellum (Papertrey Ink)
  • Patterned Paper: Wintertime by Bella Road: Snowman (Echo Park)
  • Stamps: Tiny Trees (Waltzingmouse Stamps)
  • Ink: Brilliance Pearlescent Ivy (Tsukineko), Dark Chocolate and Noir Palette (Papertrey Ink), Faded Jeans and Chipped Sapphire Tim Holtz Distress Ink (Ranger)
  • Dies: Edgers #1 (Papertrey Ink)
  • Other Tools: The Essential Glue Pad (Tsukineko), glitter (Prisma), sequin trim (dollar store)

Lily Pad Cards and CR84FN

I love the sketch being sponsored by Hero Arts over at Lily Pad Cards and had to get this one in.

I also love the colors that CR84FN has out right now... I could create a million things with this color combo!

Here is how I combined them:

Posted by Picasa

It is unfortunate that I have so few Hero Arts stamps... I have 4 sets that are very sadly waiting their turn in my cart...

I actually measured, penciled in lines and masked to stamp 3 strips of of fun typewriter-type text... But then I saw the ribbon and HAD to add it. So there went all of my meticulous stamping. Anyway, I love the kind of distress-y background it makes to the ribbon.

The ribbon and pink ink go better IRL than pictured here.

Thanks for stopping by!


{Supplies}
  • Cardstock: True Black, Stamper's Select White (both Papertrey Ink)
  • Stamps: My Type (Hero Arts), Text Style II (Papertrey Ink)
  • Ink: Smokey Shadow, Raspberry Fizz (both Papertrey Ink), Memento Tuxedo Black (Tsukineko)
  • Other Tools: Corner Chomper (We R Memory Keepers), ruffled ribbon trim (Webster's Pages), pink rhinestones (dollar store)

Thinking of You Makes Me Smile

I'm having a lot of fun scrapbooking! Today's post is of a couple of photos taken of my 6 year old grandson when he was a baby. How cute he was back then, and how handsome he is getting to be now.

Following are close up sections of the page/layout.
With this close up you can see the stamped page title on the Spellbinders label, the handwritten strips with brads, the Cuttlebug die cut leaves, and the handcut stamped flourishes.
This shot shows the tag I created by cutting out a framed image backing it with the brown patterned paper and punching a hole at the top, tying a bow with double string.
This photo just shows a close up of another flourish with leaves.

All in all, I love the colors and layout of this page. Hope you enjoyed stopping by, and please leave a comment. I'd love to check out your pages if you have any to share. I better get to trying to get off a couple of card challenges now. I'm behind schedule!